India is a rapidly developing country. A large portion of her population is joining ecommerce platforms actively, and is taking the rich culture of the country, as well as the talent of people worldwide. And thanks to Amazon, starting an online business has never been easier. Amazon India offers many opportunities for individuals and businesses to sell their products online and have a steady income. If you have ever thought about how to open an Amazon seller account, this blog will take you on a detailed journey of the entire process in a simple way.
If you are a first-time seller who is looking to scale online, this step-by-step guide will assist you in getting started on Amazon with confidence.
Why Sell on Amazon India?
Amazon is one of the largest and most used e-commerce platforms in India. Over the years, it has gained the trust of millions of people by providing good quality products, fast delivery, and attractive prices. Selling on Amazon allows you to leverage that trust and reach a whole new customer base across different cities, town and even villages, without investing in a physical store. Some of the key benefits of selling on Amazon are:
- Access to a massive customer base
- Pan-India delivery availability
- Secure and timely payments
- Tools for advertising and promotion.
Who Can Register as an Amazon Seller in India?
Almost anyone can sell on Amazon India, as long as they meet the basic requirements of Amazon. You can do your Amazon seller account registration as:
- An individual seller
- A sole proprietor
- A partnership firm
- A private limited company
Documents Required for Amazon Seller Registration
To ensure that your registration of the Amazon seller account goes smoothly, keep the following documents ready:
- PAN card (individual or business)
- GST number (mandatory for most categories)
- Active bank account details
- Address proof
- Mobile number and email ID
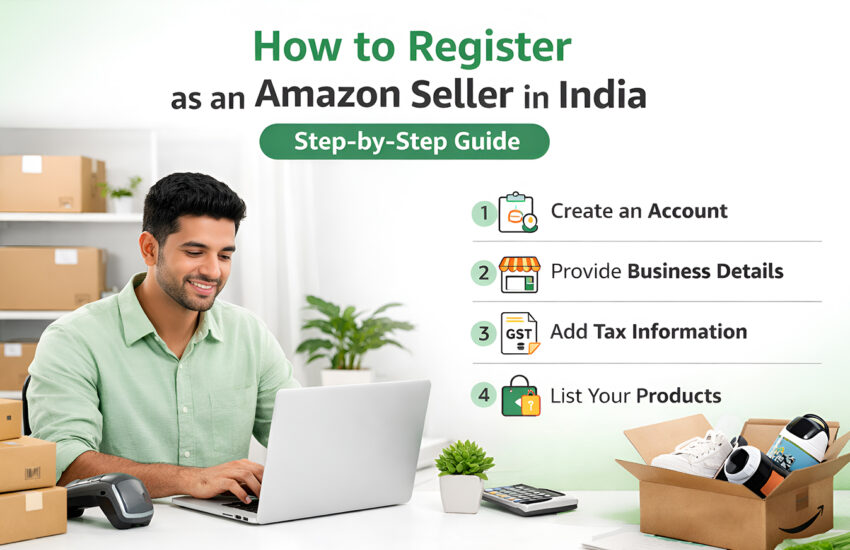
Amazon Seller Registration Step by Step
Given below is a step-by-step guide of Amazon seller registration process.
Step 1: Visit Amazon Seller Central
Open the Amazon Seller Central website and click on the “Register Now” or “Start Selling” option to get started. Once you click on that, you will be asked to create a new account, specifically for selling or to log in using your existing account.
Step 2: Enter Required Business Details
Once you are logged in, answer the basic questions related to you and your business, like your name, business type, and registered address. These details must match official documents; account approval can take a long time if they are mismatched.
Step 3: Submit PAN and GST Details
In this step, you need to provide Amazon with your accurate PAN card details and GST number. PAN is mandatory for all sellers, while GST might vary depending on your product category. Sellers should ensure that their GST is active and linked to the provided PAN.
Step 4: Add Bank Account Information
To transfer your sales earnings, Amazon requires your valid bank account details. Make sure to mention the account holder’s name, account number, and IFSC code. The bank should be active, as Amazon may perform a small verification transaction.
Step 5: Provide Contact and Pickup Address Details
The next step requires you to give your mobile number for verification and communication purposes, and your pickup address to collect products if you use Amazon shipping services. Make sure that both things are accurate and serviceable.
Step 6: Select Product Categories
You will then select the category of your product that you are selling. Some categories are open while some may require additional approvals, documents, or authorizations. Selecting the right category helps determine competition level and fees.
Step 7: Complete Verification and KYC
Amazon may ask you to conduct KYC or document verification to confirm your identity. You may be asked to show your PAN card, GST certificate, and address proof in the video to ensure marketplace safety. Complete your KYC within the given timeline.
Step 8: Account Activation and First Login
Once all details are verified, Amazon activates your seller account. You will receive a confirmation email, and full access to Seller Central will be unlocked. From here, you can start listing products, setting prices, and preparing inventory.
Step 9: List Your First Product
After your account is registered successfully, you can start by adding your first product by entering the title, description, product images, price, and the stock available. Optimize your listings with the help of Amazon marketing services to rank higher.
Step 10: Choose Fulfillment Method
The last step of the Amazon seller onboarding process requires you to choose how you want to ship your products: yourself or use Fulfilled by Amazon (FBA). Once this is decided, your products can go live, and you are set for success.
Final Thoughts: Amazon Seller Registration is the First Step to Success
Registering as an Amazon seller in India is an easy and straightforward process. If you are a new business launching to sell on Amazon successfully, prepare, optimize, and execute your strategies with an Amazon marketing agency, which can help you kick-start your journey on Amazon effectively. Seller account registration is just the first step in a long journey of selling on Amazon.
MMF Infotechs leverages its marketing expertise so that you can stand out from the crowd from the beginning.